Future-proof network infrastructure for new-build homes
Building a new house? Plan a fast, reliable and scalable home network while your walls are still open: four golden rules, a practical cabling walk-through, and a shopping list.
Let’s say you are building a new house. Once it is finished, your internet provider shows up, hooks up your broadband connection (coax or fiber) and mounts a shiny all-in-one modem which promises gigabit speeds. You run a speed test in the living room and get 20 Mbps. The bedroom gives you 15 Mbps, and in the garden you barely have a connection at all.
This post contains all the details to plan a fast, reliable and scalable home network while your walls are still open. But first, let’s look at what goes wrong in the scenario above.
Why the default setup fails
The device your internet provider installs is a modem, router, switch and Wi-Fi access point crammed into a single box (in Belgium: the Telenet modem or the Proximus Internet Box). It sits where the coax or fiber enters your house, which typically means the garage, the basement or next to the fusebox. That is the worst possible spot for a Wi-Fi signal to reach the rooms where you actually live.
Your provider knows this, so it sells you Wi-Fi repeaters like the Telenet Wi-Fi Pods or the Proximus extenders. Consumer mesh systems like Netgear Orbi or TP-Link Deco follow the same principle: they relay your wireless signal from room to room. They have gotten better over the years and they are fine as a retrofit solution, but they come with some important disadvantages:
- Speed: every wireless hop between nodes reduces bandwidth and adds latency.
- Scale: once you are running 15 to 20 connected devices (smart lights, thermostats, cameras, speakers, a robot vacuum, your kids’ tablets), the whole thing starts to crumble. Adding repeaters just means more wireless hops and more congestion.
- Reliability: wireless cameras and video doorbells are easy to deploy, but they tend to drop their connection or end up in a dead zone where your Wi-Fi simply doesn’t reach.
Meanwhile, IP has become the standard protocol for pretty much everything in your home. Your lights, doorbell camera, solar inverter, EV charger and thermostat all communicate over your home network, and this trend is only accelerating. Security is becoming a real concern too: with AI-powered attack tools getting more sophisticated by the day, a robust and properly segmented network is no longer a luxury.
Bottom line: repeaters and mesh are fine if your house is already finished, but they are far from ideal. If your walls are still open, getting the cabling right is relatively cheap compared to your overall construction budget, and it will serve you for 20+ years. Retrofitting cables into finished walls and ceilings is where it gets expensive and messy.
The rest of this post is in two parts: four golden rules that capture the thinking, and then a practical walk-through to plan the cabling.
The four golden rules
Rule 1: run cables where you can, use Wi-Fi for the rest
Most modern devices come with a Wi-Fi connection, and Wi-Fi works. But nothing beats a physical cable: it is faster, more reliable and more secure. It also frees up Wi-Fi spectrum, since every stationary device you hardwire is one less device competing for wireless bandwidth. So the rule is simple: use UTP cables for every stationary device that supports it, and reserve Wi-Fi for everything else.
Here is what that looks like for a typical modern home.
Devices you should wire with UTP:
- NAS (e.g. Synology)
- Set-top box (e.g. Apple TV or Google TV)
- Smart TV
- Gaming console (e.g. PlayStation)
- Audio receiver
- Laptops and desktop computers
- Camera system
- Doorbell and chime
- Alarm system
- IoT bridges (e.g. Philips Hue Bridge or Aqara Hub)
- Solar inverter
- EV wallbox charger (e.g. Alfen or Smappee)
- Thermostat
Devices that are typically Wi-Fi only:
- Printers (office-grade models often have a UTP port)
- Smart speakers (e.g. HomePod or Sonos)
- Indoor air conditioning units
- Smartphones
- Tablets and e-readers
- IoT devices (light bulbs, light strips, smart plugs)
- Home appliances (dishwasher, washing machine)
- Robot mower
- Robot vacuum
That second list is still surprisingly long, which brings us to the next rule.
Rule 2: ditch mesh, go for hardwired access points
All devices in that second list rely on a stable and fast wireless connection. If your Wi-Fi drops or gets congested, your smart home becomes a dumb home real fast. That makes mesh the wrong foundation for a serious home network.
A proper setup uses dedicated access points which each have their own UTP cable to your central switch, instead of nodes relaying traffic over the air. This gives you:
- Higher throughput: the backhaul is wired, so every access point delivers full speed
- Lower latency: no wireless hops between nodes
- Better reliability: a cable doesn’t suffer from interference
- Lower power consumption: hardwired access points consume less power than mesh satellites
One ceiling-mounted access point per floor is a good starting point. If you are pulling cables anyway, wire your access points too.
Rule 3: terminate your UTP cables properly
A pulled cable is useless until both ends are terminated: cleanly, consistently and in a way you can still service years later. In the network cabinet, every cable lands in a patch panel. At the endpoint, use a finished wall socket where it shows and a cheaper keystone jack where it doesn’t. Skip this and you end up with a bird’s nest of bare cables in your cabinet and crimped connectors that fail one by one.
The practical part below shows exactly how to do this, with products and prices.
Rule 4: PoE is your best friend
Power-over-Ethernet (PoE) is a standard which delivers both data and electrical power over a single UTP cable. Low-power devices like access points, cameras, doorbells and chimes don’t need a separate 230V outlet: one thin cable does it all. For a new build, this means:
- No separate electrical circuit to every camera or access point
- No batteries to replace
- Cleaner installations, especially for ceiling-mounted access points and recessed cameras
- Centralized power management: the PoE switch in your network cabinet powers all these devices, so you can monitor and even reboot them remotely
So the rule: whenever a device comes in a PoE version, that is the one you want. All you need is a PoE-capable switch in your network cabinet.
Putting it into practice
With the rules in place, here is the actual sequence: decide where the cables go, pick the cable, terminate both ends and choose the hardware they plug into.
Step 1: plan where your cables go
Every cable starts in your network cabinet (typically near the fusebox) and runs to one of the locations below. You could add a small switch at every TV spot, but I recommend keeping things simple: one central switch for the entire house, and enough cables pulled upfront to every location.
- NAS: 1 UTP outlet and a 230V outlet. Your NAS often holds your most precious data (family photos, home videos, personal documents), so put it in a secure, dry and temperature-stable location, ideally hidden away to protect it against theft. Think of a closet, the basement or a temperature-controlled attic. Sidenote: a NAS is not a backup strategy by itself, so back it up regularly to an online service or an offsite USB drive.
- TV spot: at least 4 UTP outlets for every location where you plan to put a TV. That sounds like a lot, but a smart TV, a set-top box, a gaming console and an audio receiver already add up to 4 devices.
- Home office: at least 1 UTP outlet per desk seat. If you work from home regularly, you want the most stable connection possible for video calls and large file transfers.
- IoT bridges: a UTP outlet per bridge and a 230V outlet, in a central location in your house (e.g. the back of a centrally located closet). Devices like the Philips Hue Bridge or Aqara Hub act as a wireless bridge to your smart bulbs, sensors and plugs, so they need good signal coverage to all corners of the house.
- EV wallbox charger: 1 UTP cable to the spot where the charger will be installed. It needs a network connection for smart charging, energy management and firmware updates.
- Solar inverter: 1 UTP outlet. The inverter is typically installed near the fusebox, often in the garage or basement. The network connection allows you to monitor your solar production and integrate it with your home energy management system.
- Alarm system: 1 UTP cable for the main panel (also typically near the fusebox) and potentially an extra one for the control keypad. Buy your alarm system before wiring your house, so you know the exact cabling requirements.
- Garden shed or pool house: at least 2 UTP cables to any detached building. Use outdoor/ground-rated cable (it has a PE coating against moisture and UV) and run it through a conduit, so it is protected and easy to replace later. A pool house might need a camera, an access point and a spare outlet for a notebook (a garden home office), which is more than two cables. You then have two options: pull a separate cable per device all the way back to your central switch, or pull a couple of cables to a small switch in the building. For that second option the UniFi Flex is a great fit: a 5-port switch for indoor and outdoor use which can itself be powered over PoE, so no 230V outlet is wasted on it.
Flush-mount devices: access points, cameras, doorbell, chime and thermostat
This is where it gets tricky. These devices are installed in plain sight: access points on the ceiling of every floor, cameras and doorbells on exterior walls, chimes and thermostats on interior walls. Many of them have a sleek, flat profile with a special mounting bracket for a clean finish.
I use the UniFi ecosystem by Ubiquiti for all of this: everything is managed through a single app, the hardware is well-designed and the pricing is very reasonable for the quality you get. The product examples in the rest of this post are all UniFi gear, but the brand is secondary. The architecture is what matters.
UniFi has neat mounting options for every category:
- Access points like the U7 Lite against the ceiling (installation guide)
- The Doorbell Lite on your front wall (installation guide)
- The PoE Smart Chime recessed in a wall (installation guide)
- Cameras like the G5 Turret Ultra on ceilings or soffits (installation guide)
The result looks incredibly clean, but only if you plan your cabling correctly. The installation instructions for these devices often assume suspended ceilings or hollow stud walls, with plenty of room to tuck the UTP cable behind the device. With concrete ceilings and brick walls (very common in Belgian new builds), the cable needs to come out at exactly the right spot and there is very little room to push excess cable back. Special mounting boxes exist for some devices, but they result in a bulkier installation.
My strong advice: buy these devices before pulling your cables. Study the mounting instructions and go over them with your electrician, so you know exactly:
- Where the cable exit point should be
- What hollow space you need behind the mounting point
- Whether you can route the cable through hollow-core concrete ceiling slabs
Step 2: pick your cable (Cat6a or Cat6)
For most runs in your house, Cat6a is the way to go. It supports 10 Gbps over distances up to 100 meters and is well protected against interference, which makes it the future-proof choice.
The downside: Cat6a cable is thick and stiff. This makes it hard to work with in tight mounting situations, and crimping an RJ45 connector directly onto Cat6a is no fun at all. For flush-mount devices like recessed cameras, doorbells or slim access points, you have 2 options:
- Run Cat6 all the way to that device. It is thinner, more flexible and much easier to work with in tight spaces. The downside is that this run is capped at Cat6 performance.
- Stick with Cat6a for the full run, terminate it in a keystone jack near the mounting point and use a short (10 to 20 cm) flexible Cat6 patch cable for the final connection to the device. UniFi has an installation guide for terminating their Cat6A keystone jack.
Option 2 is the smarter one: the cabling in your walls stays Cat6a, which is much more future-proof, and you only use the thinner Cat6 for the very last stretch.
Bottom line: Cat6a as the default, Cat6 where flexibility matters.
Step 3: terminate both ends
This is golden rule 3 in practice. Every cable gets terminated in the network cabinet and at the endpoint.
In the network cabinet
All your cables come together in a patch panel, which gives you a clean, organized row of RJ45 ports: one for each cable run in your house.
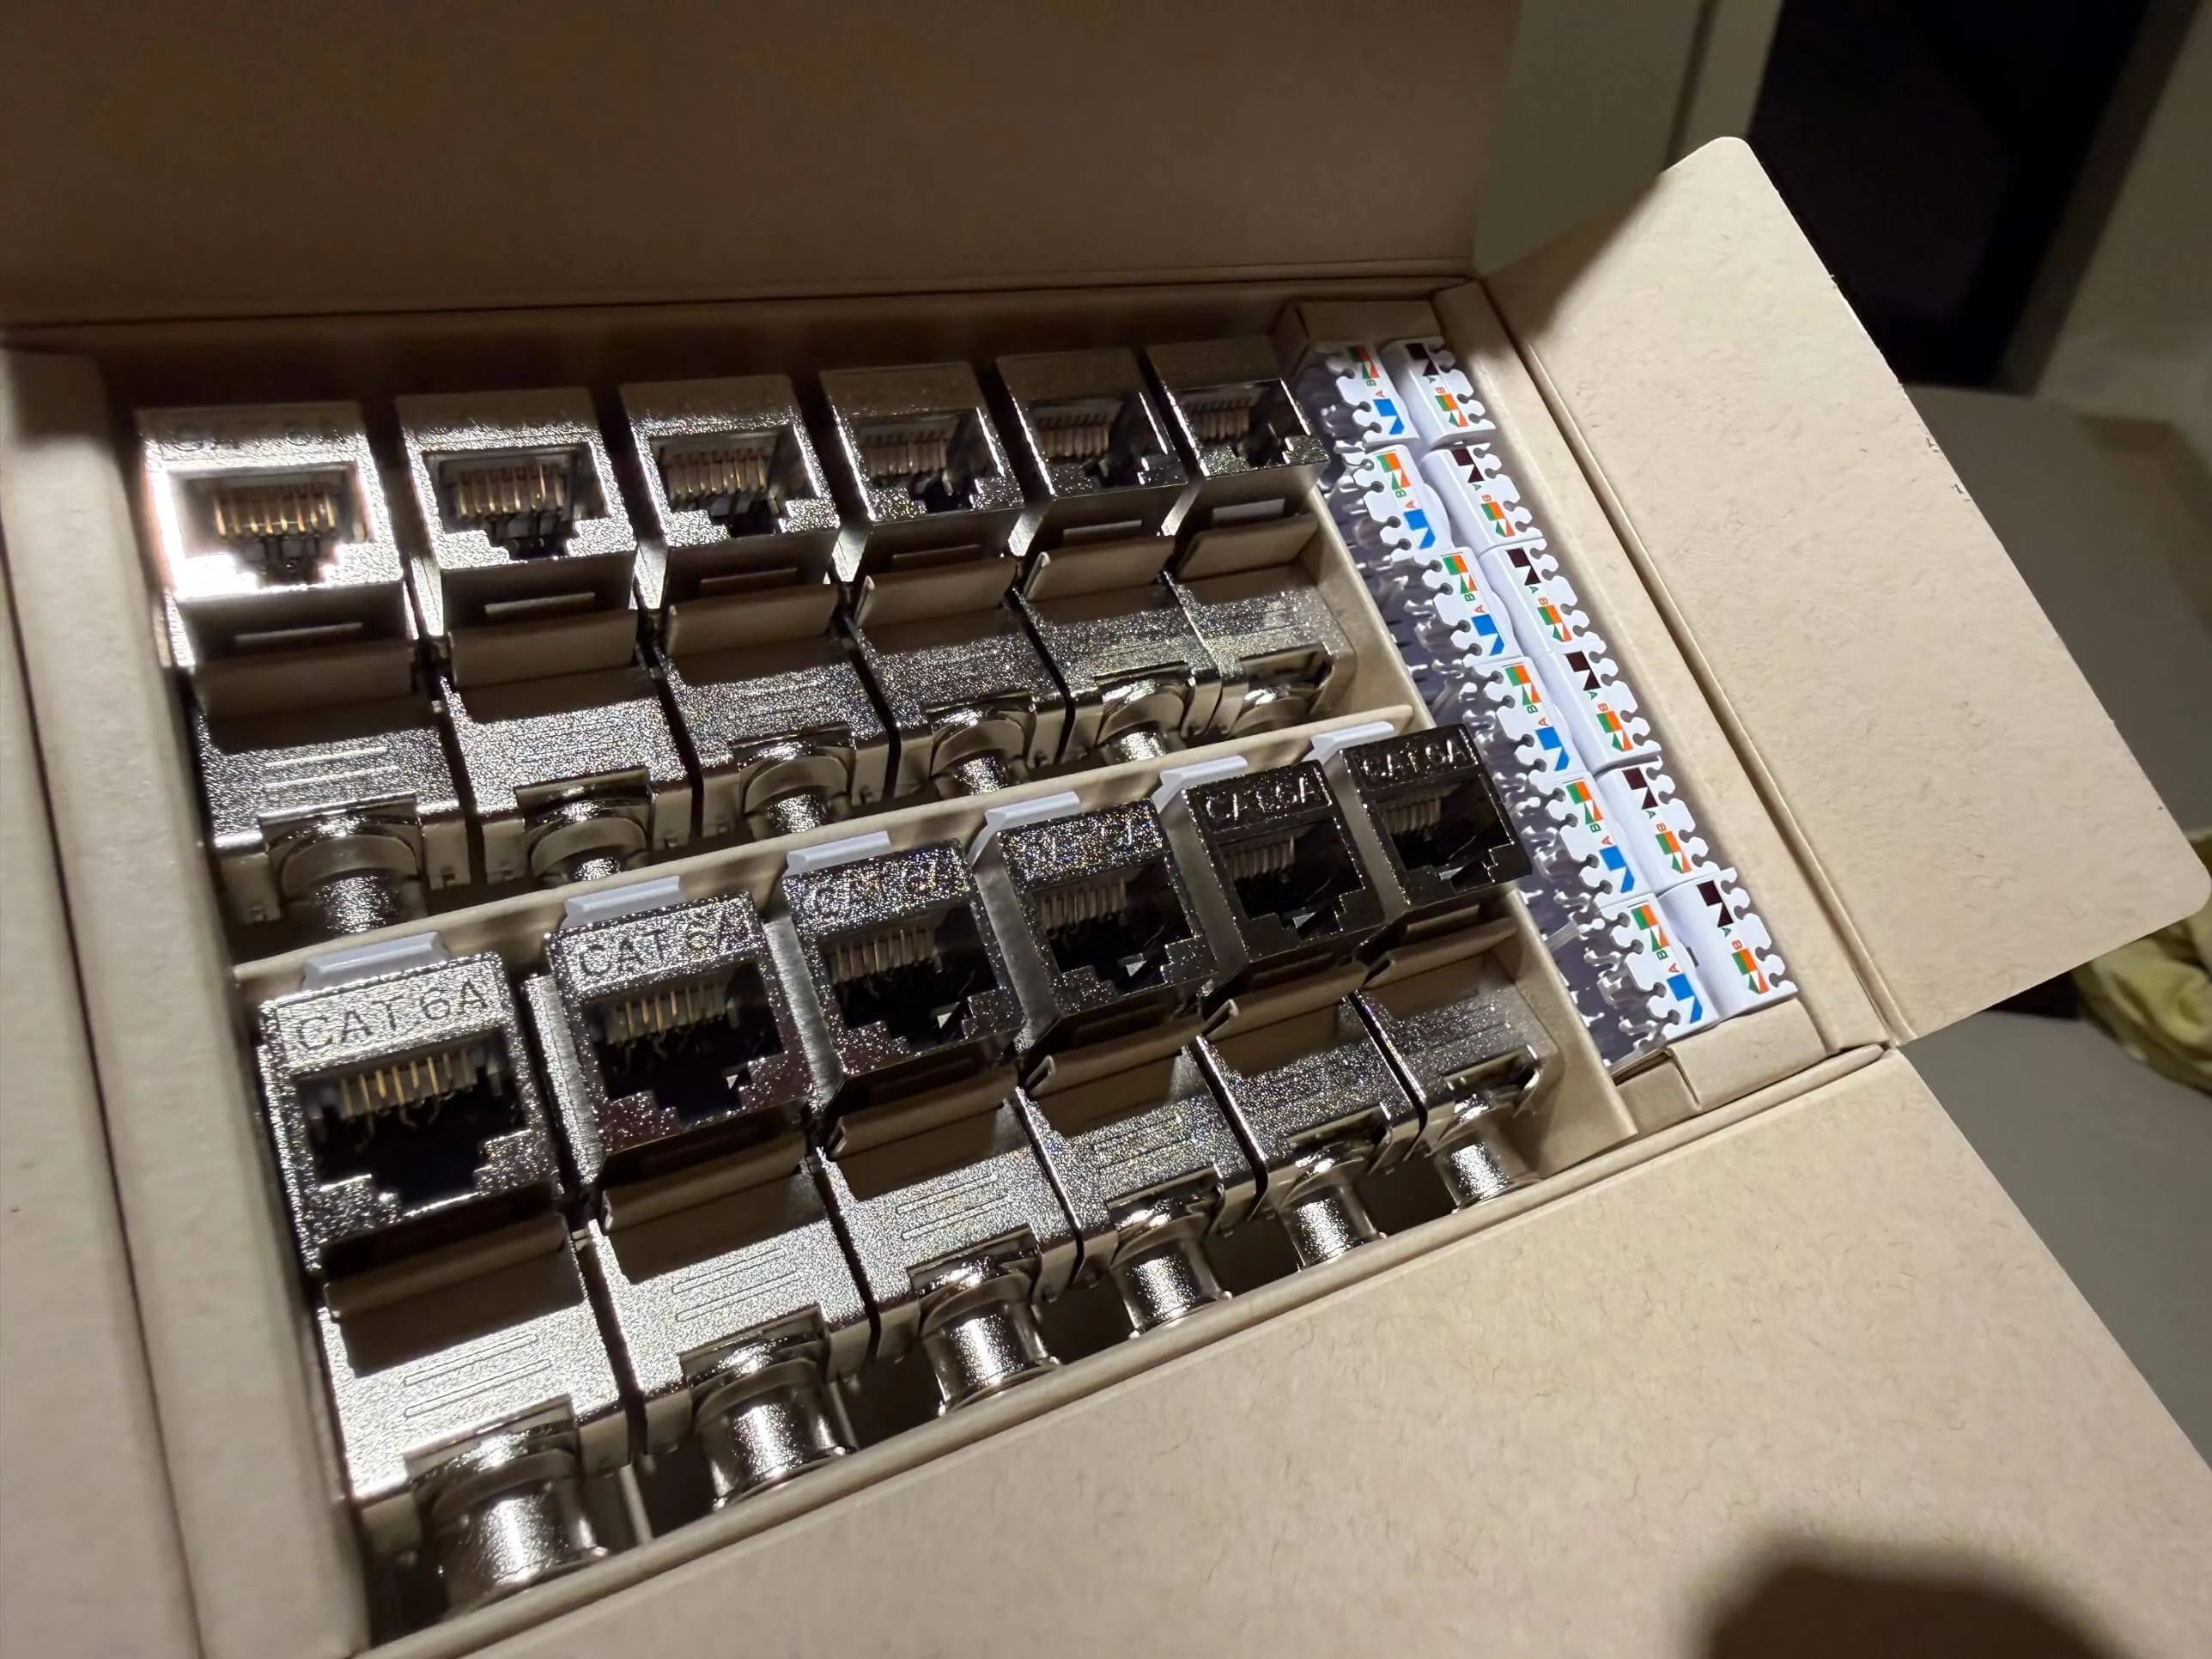
I recommend the UniFi 24-Port Blank Keystone Patch Panel in combination with Cat6A keystone jacks. Instead of punching down wires into a fixed panel or crimping RJ45 connectors onto thick Cat6a (fiddly and error-prone), you terminate each cable in a small snap-in module and click it into the panel. It is toolless and quick, and you can easily replace a single jack if you ever mess one up. From the patch panel, short patch cables run to your switch.
At the endpoint
Most people assume they need a finished RJ45 wall socket at every location, like the Niko dual Cat6a outlet. For visible spots like your living room wall, that is exactly what they are designed for. But at €30 each they add up quickly, and many of your cables end in places nobody ever sees: inside a closet, behind a TV cabinet, under a desk. For those spots, keystone solutions are much cheaper, faster to install and work just as well.
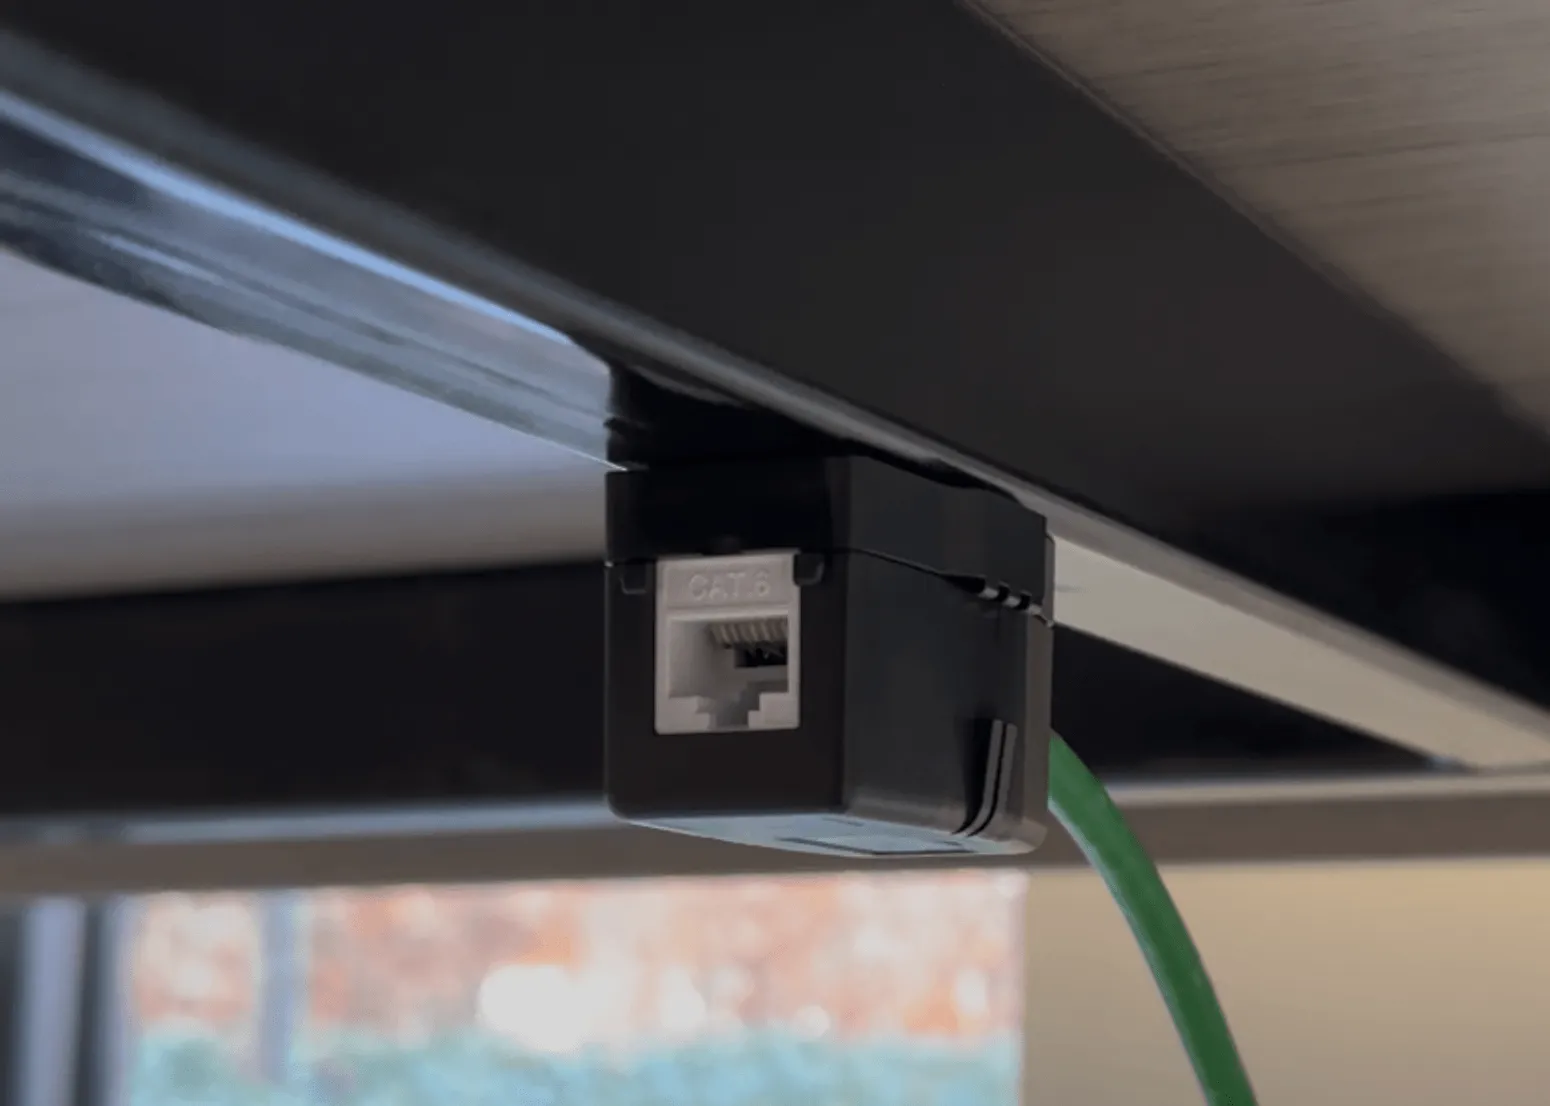
Under your desk: a single magnetic keystone box clipped under the desk gives you a clean RJ45 port without drilling into the wall. The cable comes up through the floor or wall, terminates in a keystone jack and snaps into the box.
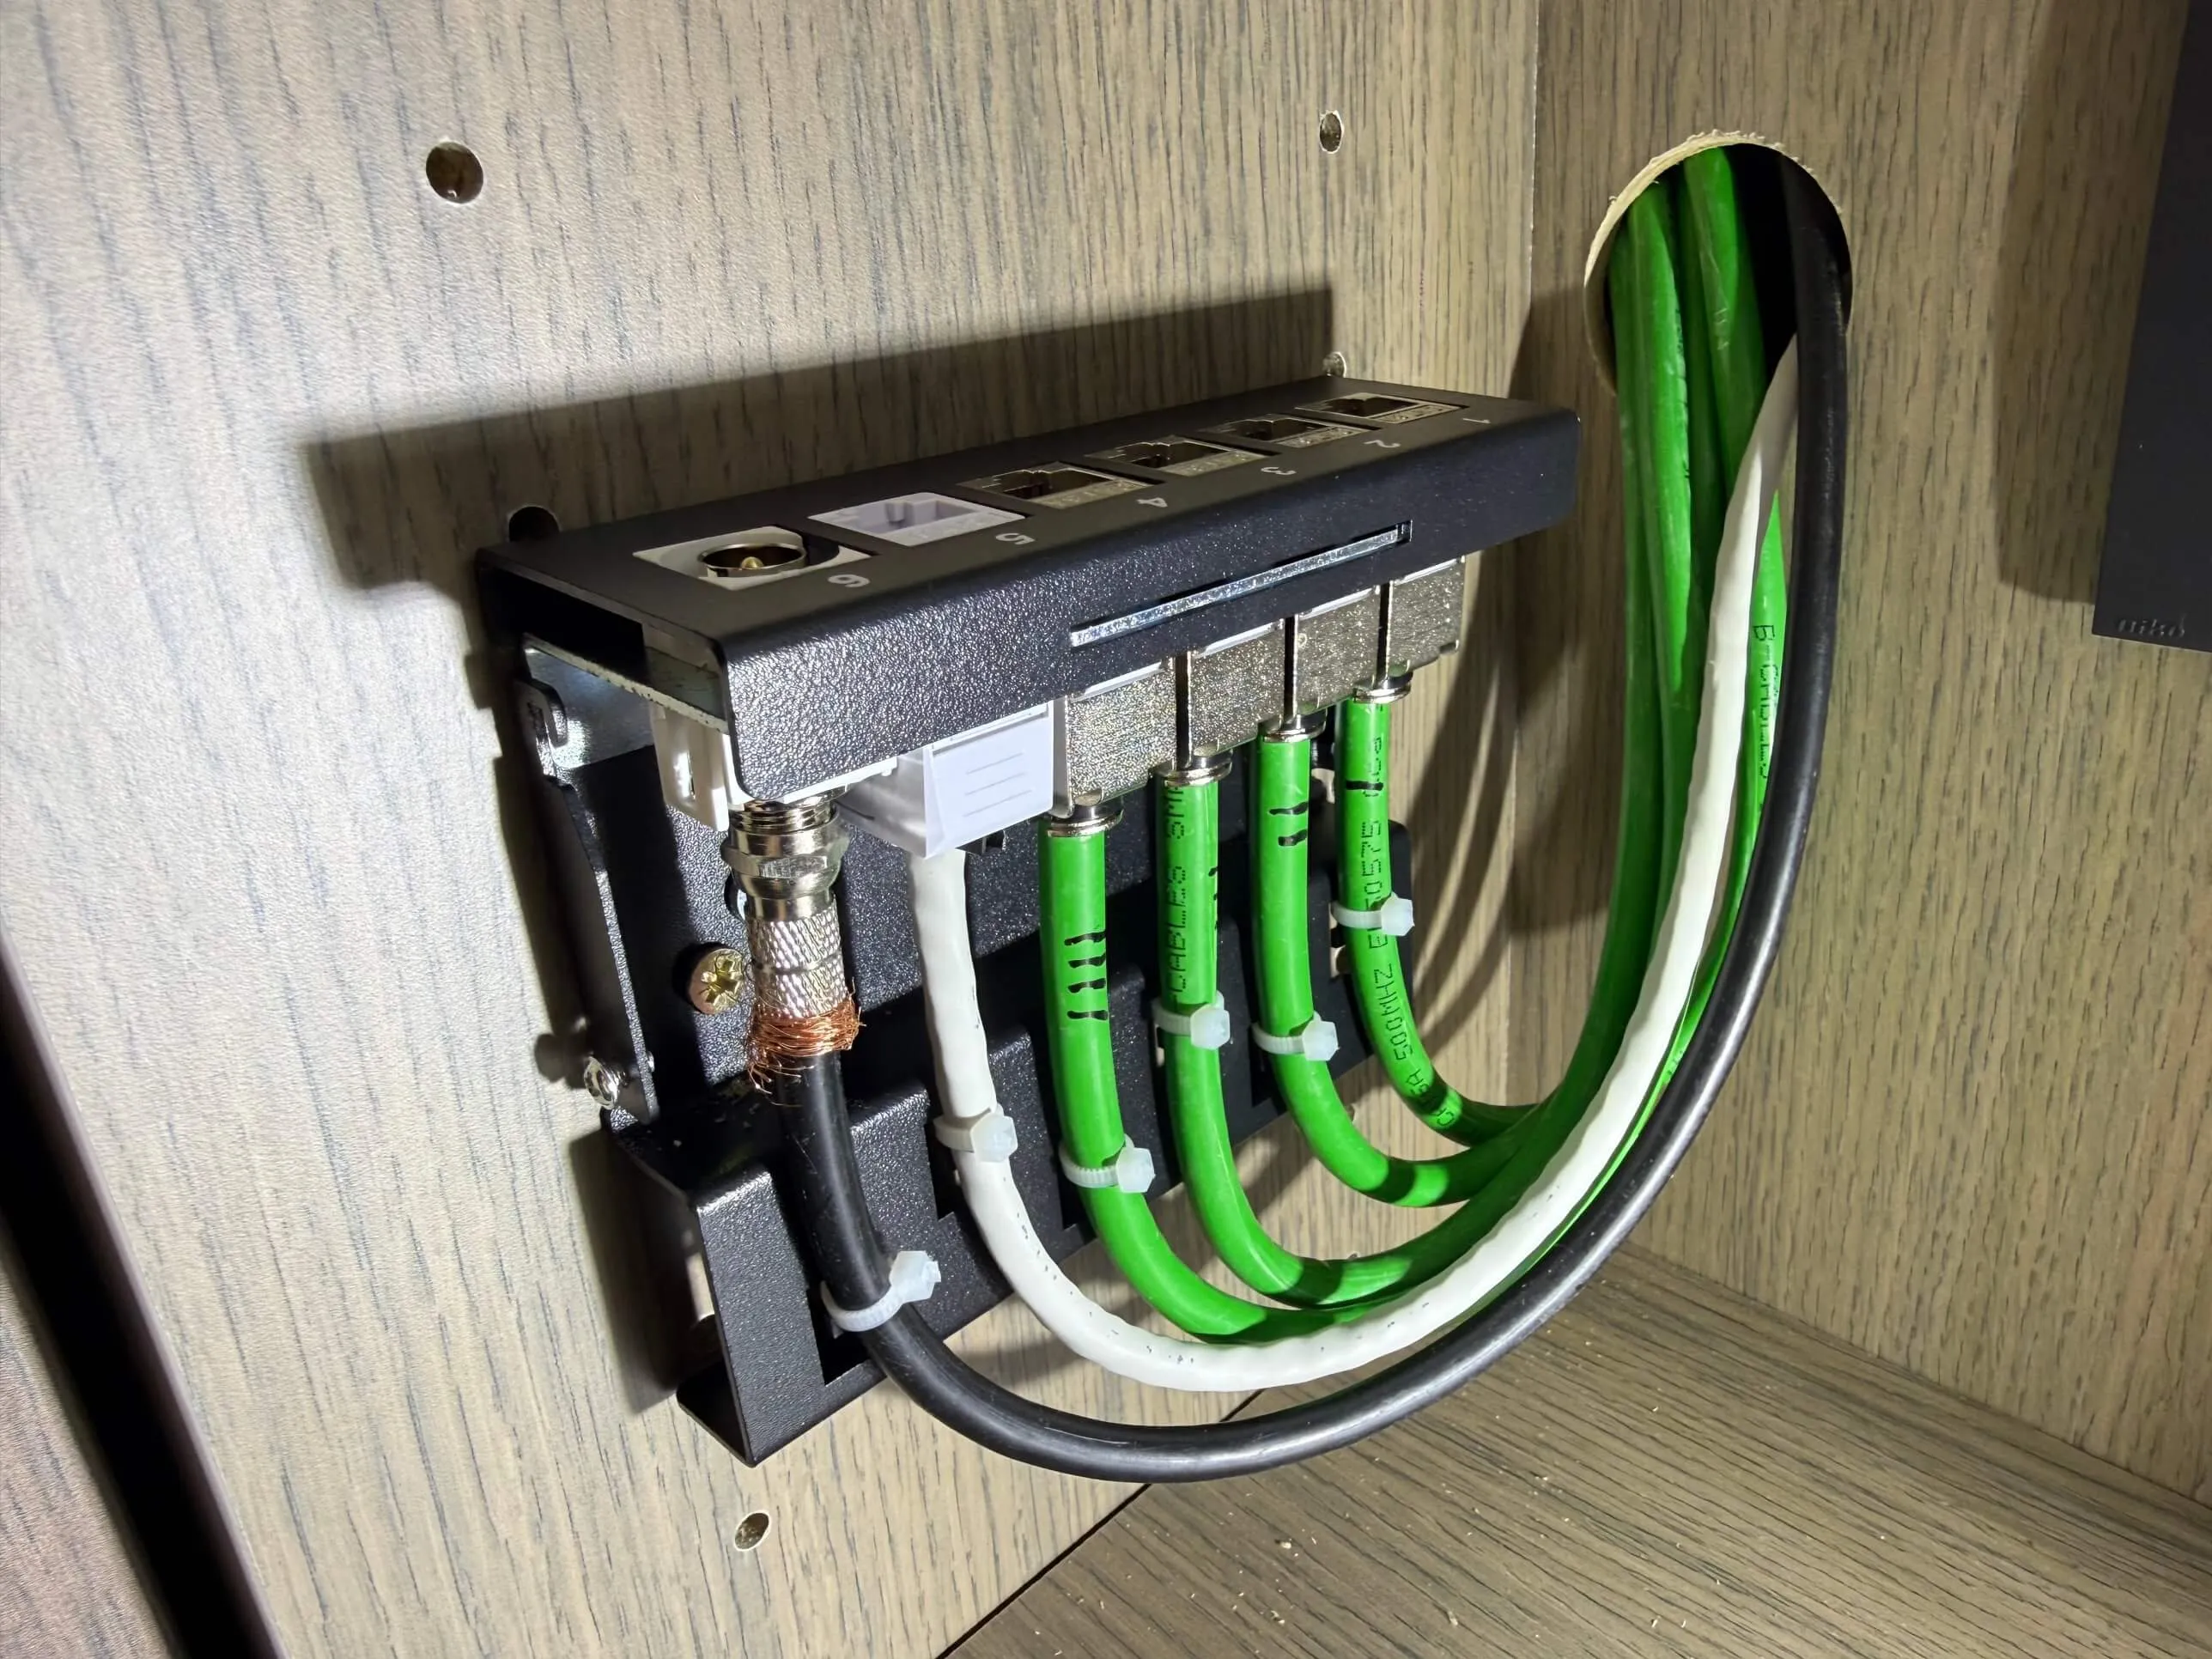
In your TV closet: instead of a row of Niko wall sockets, mount a small keystone box (this one holds 6 modules) inside the closet where your media gear lives. All cables terminate there, hidden from sight, and short patch cables connect each device.
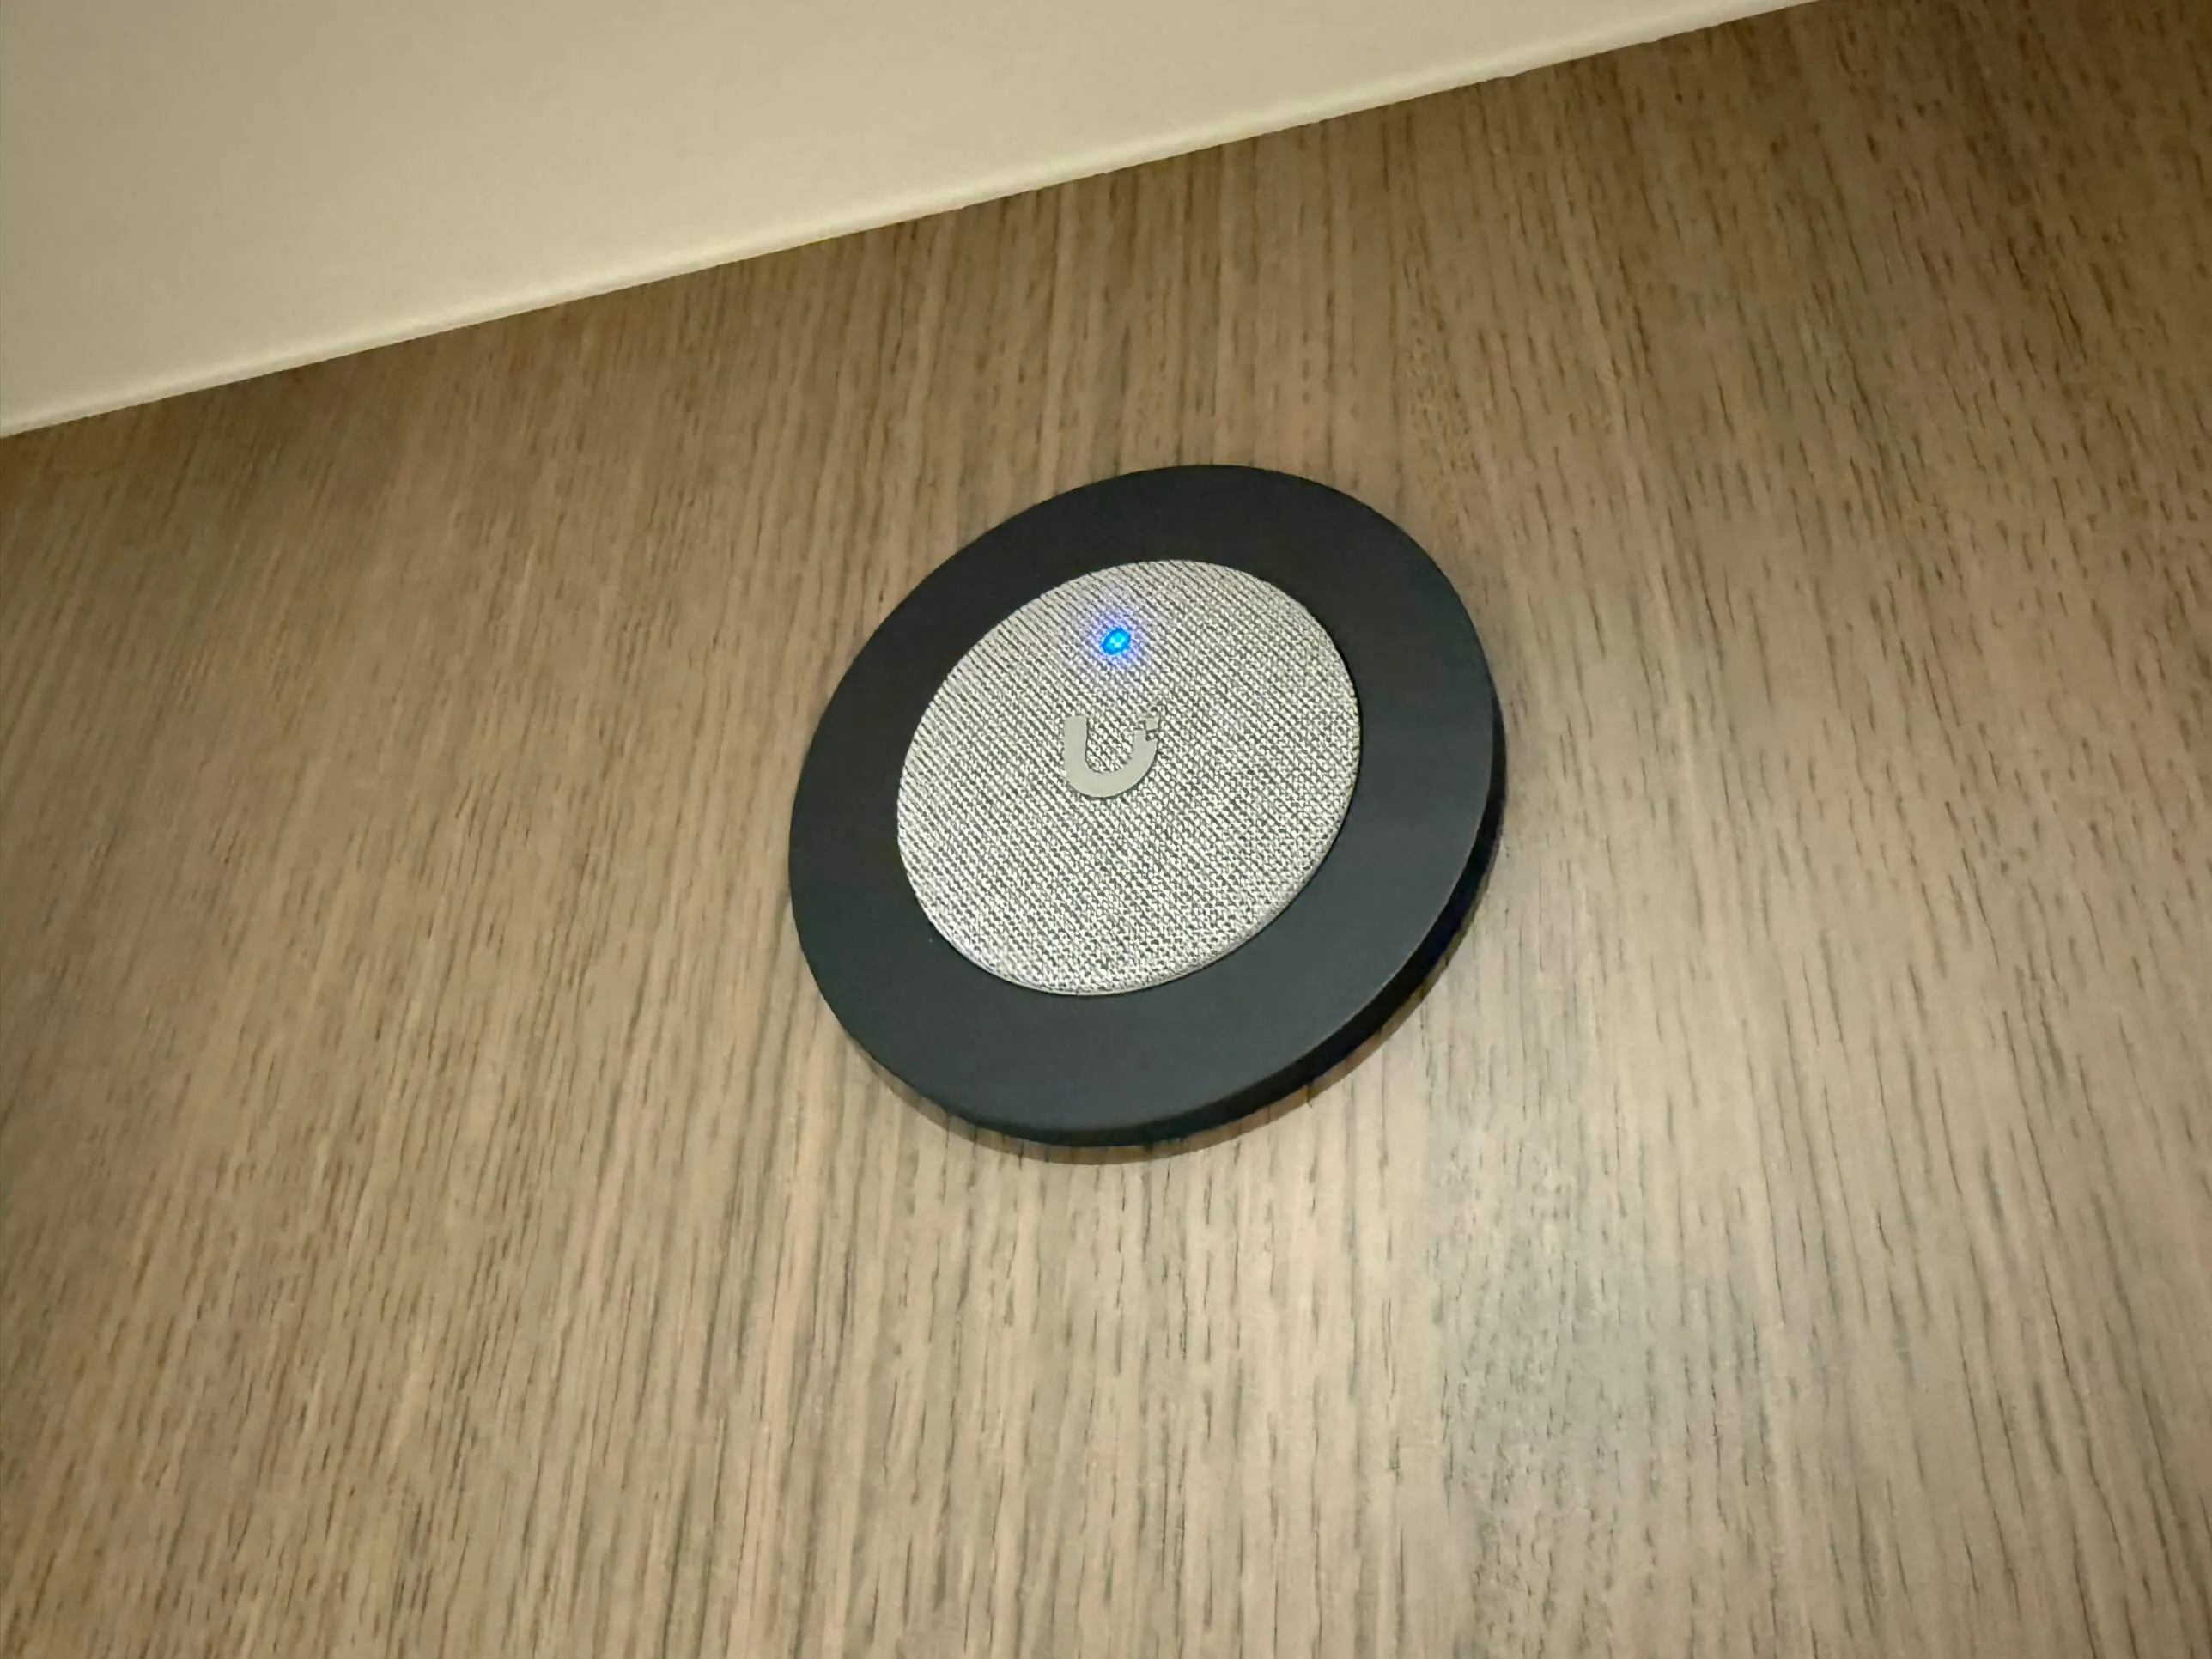
Flush-mounted devices: for devices like the PoE Smart Chime, the cable goes straight into the device itself (if needed via the keystone jack and short patch cable from step 2), so no wall socket is needed at all.
Step 4: choose your hardware
This is the active gear your cables plug into. Apart from the access points, all of it sits in your network cabinet, next to the patch panel.
- Broadband modem: provided by your internet provider. In Belgium, this is typically a cable modem (Telenet, VOO) or a fiber ONT (Proximus, edpnet). Put the all-in-one device in bridge mode (modem only) and let dedicated gear handle the rest. Tip: if you are with Telenet, make sure you get a modem that supports bridging, like the CV8560E. That is what lets you hand routing over to your own gear. As a nice bonus, the CV8560E has no built-in Wi-Fi at all, so there is no built-in Wi-Fi to disable and work around.
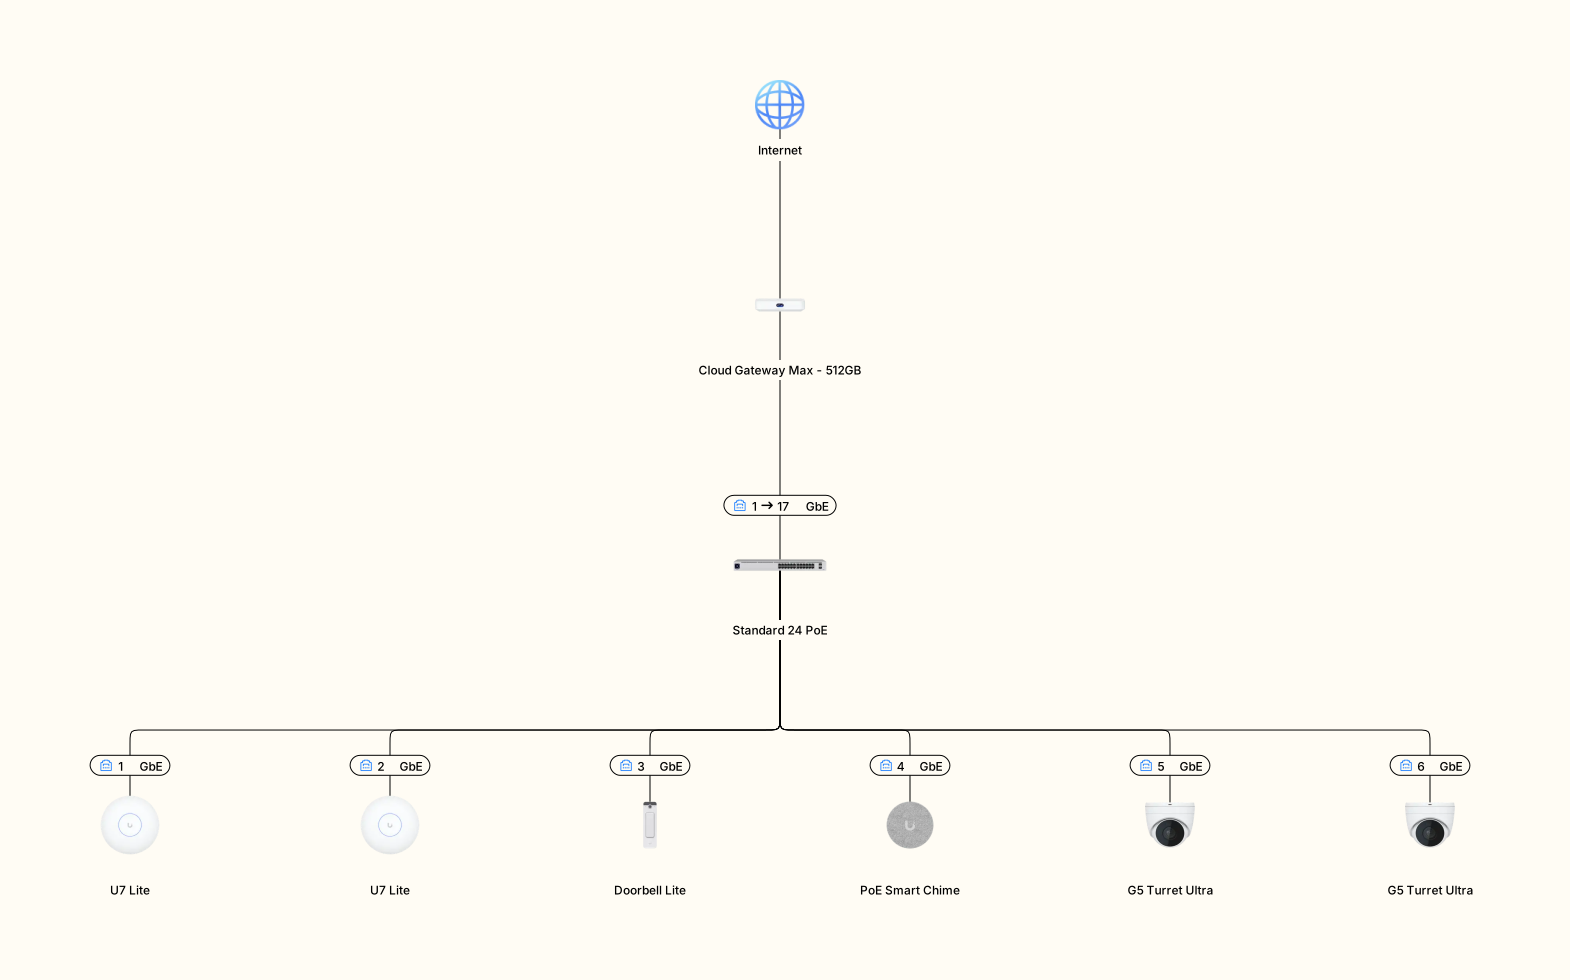
- Router: the brain of your network. It handles traffic routing, firewall rules, VLAN segmentation and DHCP. I recommend the UniFi Cloud Gateway Max: a compact, affordable device with a 2.5 GbE WAN port and 4 LAN ports. It runs the entire UniFi management stack, so you can manage your whole network from a single app. It also has a built-in NVR (Network Video Recorder). Go for the 512 GB SSD version, so your camera footage is stored locally without a cloud subscription.
- Switch: the central hub which connects and segments all your home network traffic. Go for a managed PoE switch, so you can power your access points, cameras and doorbell from here. The UniFi Standard 24 PoE is an excellent choice: 24 Gigabit ports (16 with PoE+), a total PoE budget of 95W, fanless cooling and a small touchscreen for management.
- Access points: ceiling-mounted, hardwired via UTP and powered by PoE. The UniFi U7 Lite is a great value pick: Wi-Fi 7, a compact design and very easy ceiling mounting.
Here is what the complete setup looks like:
What does this cost?
Let’s put together a realistic shopping list for a solid setup. These are current prices from the UniFi EU store and Belgian suppliers, including 21% VAT where applicable and excluding installation labor. I split it into two groups: the network itself, and the security devices (doorbell, chime and cameras) which are optional and easy to add later.
Network infrastructure
| Item | Qty | Unit price | Total |
|---|---|---|---|
| UniFi Cloud Gateway Max (router + NVR, 512 GB) | 1 | €330 | €330 |
| UniFi Standard 24 PoE (managed switch) | 1 | €411 | €411 |
| UniFi U7 Lite (Wi-Fi 7 access point) | 2 | €108 | €216 |
| Cat6a UTP cable (300 m) | 1 | ~€1/m | €300 |
| Niko UTP wall socket (dual Cat6a, flush-mount) | 10 | €30 | €300 |
| UniFi 24-Port Keystone Patch Panel | 1 | €30 | €30 |
| UniFi Patch Cable 10 GbE (0.3 m) | 24 | €3 | €67 |
| UniFi Cat6A Keystone Jack (12-pack) | 2 | €42 | €85 |
| RJ45 connectors (bag) | 1 | €10 | €10 |
| Subtotal | ~€1,749 |
Security devices
| Item | Qty | Unit price | Total |
|---|---|---|---|
| UniFi Doorbell Lite (PoE video doorbell) | 1 | €108 | €108 |
| UniFi PoE Smart Chime | 1 | €91 | €91 |
| UniFi G5 Turret Ultra (2K PoE camera) | 2 | €97 | €194 |
| Subtotal | ~€393 |
That is around €1,750 for the network and another €400 for a doorbell, chime and two cameras, so ~€2,150 all in. No monthly cloud subscription, and a fraction of your total construction budget.
Need more cameras? The G5 Turret Ultra costs €97 apiece, which is remarkably affordable for a weatherproof 2K PoE camera with night vision. You can add as many as your switch has PoE ports (and PoE budget) left.
Invest now, enjoy forever
Structured cabling is one of the best investments you can make in a new build. The effort is small during the rough-in phase, and the number of networked devices in your house will only grow. So talk to your architect and your electrician early, and show them this post if you need to. And remember the four golden rules:
- Run cables where you can, use Wi-Fi for the rest
- Hardwire your access points
- Terminate your UTP cables properly
- PoE is your best friend
Happy building! 🏠