Managing screenshots like a pro on macOS

4 March 2025

The default screenshot workflow on macOS is far from ideal. Let's look into a far better approach.

By default, screenshots in macOS are saved to the desktop. In addition, before the image is saved, a small preview is shown in the bottom right corner of the screen (see image below).

Default macOS screenshot behaviour

The preview can be used to quickly open the screenshot in the Preview app, edit it, save it, etc. However, if you're not fast enough, the preview disappears and you are out of luck. Back to the desktop then, which is probably already cluttered with icons.

Let's be honest, the desktop is a horrible place for storing screenshots, since you typically want to drag these images into apps like e.g. Keynote, Mail or MS Teams. I think a much better place is the Dock, which is always visible or can quickly be made visible by a mouse gesture. It's the ideal place to have files readily available to be used. Let's dive into how to set this up properly!

Create a dedicated folder for screenshots

Open Terminal and execute the following command (adjust the folder to your preferences):

$ mkdir ~/Pictures/Screenshots

Drag the new folder to the Dock

Go to the Finder and drag the Screenshots folder into the dock, next to the Trash icon. Set sorting of the stack to Date Added, set display style to Stack and set view mode to Fan.

Dragging the newly created Screenshots folder into the Dock
Fine-tuning the Screenshots folder in the Dock

Change the storage location for screenshots

Open Terminal and execute the following command (set the folder to the one you chose above):

$ defaults write com.apple.screencapture location ~/Pictures/Screenshots

Disable screenshot previews

These previews are annoying as hell, since they slow down the process of saving the screenshot to disk. Open Terminal and execute the following command:

$ defaults write com.apple.screencapture show-thumbnail -bool false
That is that! Take a screenshot now! It gets saved instantly to the folder you chose, and is immediately presented in the stack in the Dock, ready to be dragged into other apps. It's glorious! 🤩

An ode to The War

3 March 2025

I remember vividly the 30th of June 2022. It was that time of the year again: Rock Werchter! Unlike the weather, the line-up was blistering: Black Pumas, Beck, Fontaines D.C., HAIM, Pixies, Pearl Jam and The War on Drugs. All on that same day 🤩 I knew more or less what to expect from this lineup, except for The War on Drugs...

I heard that The Drugs had a solid live reputation, so I was eager to check them out. Their set started off great with Nothing to Find, one of their most bright and positive songs. What followed however, was - as expected - a trip down into the dark regions of Adam Granduciel's troubled soul, the mastermind behind The War on Drugs. In an interview for Elsewhere from 2023, he mentioned the subjects of his work: “I do write about my experiences and I never feel I could sing from someone else's perspective, it feels awkward to me. I try to tell a story, but I'm figuring out my life.” That life appears to be wreathed with angst and other struggles. As described at length in an interview for Loud And Quiet from 2014, he struggles with depression, fear, anxiety, loss and self-doubt. These feelings are indeed deeply interlaced within most of his songs, especially in their 3rd album, Lost In A Dream.

Having studied fine arts, but lacking the patience and discipline for painting, Granduciel was attracted to music after his studies, an art form that suited him better. Together with similar spirit Kurt Vile, they founded The War On Drugs in 2005. Granduciel appeared to be a great storyteller and is able to express his feelings through his songs with much precision. Next to that, his compositions are characterized by an increased layering throughout, much like a master chef working his puff pastry. He is able to put forward entire landscapes layered in sound.

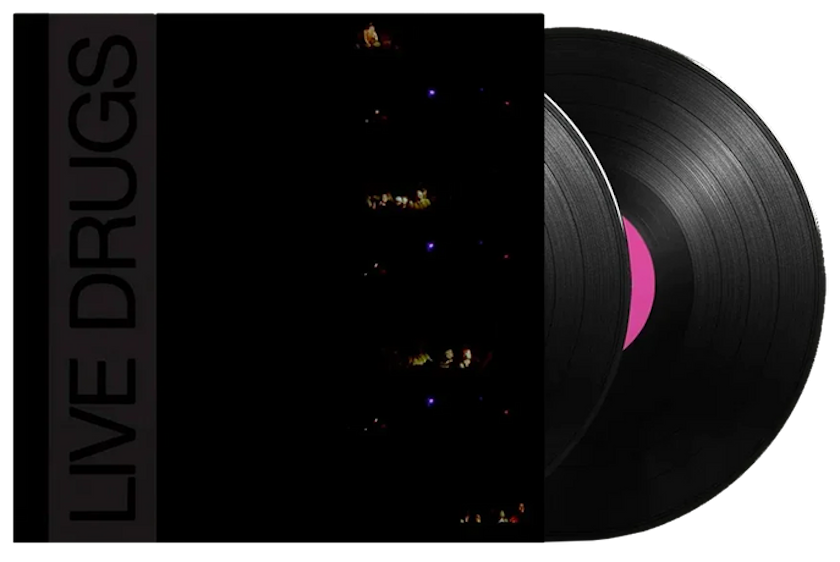
With An Ocean in Between the Waves, Granduciel is painting such a landscape, albeit an enigmatic and haunting one. It was the third song on the setlist of that damp and cloudy evening at Werchter. Being the first time I heard a live version of this song, I was blown away. Back home, I started looking online for live recordings. At that time, I discovered the Live Drugs album, a collection of 10 songs captured live on tour between September 2017 and December 2018. In the recording of An Ocean in Between the Waves, as appearing on that album, the band elevates the studio version to new heights, transforming it into a mesmerizing odyssey.

Now, get into your car and turn up the volume to 11! 🔊😁 Let's dive in 🥐

Vinyl copy of the Live Drugs album

The song kicks in with Charlie Hall starting a steady beat on his drumkit. This beat will appear to be our companion throughout the entire song, a driving force, an insistent journey forward. Like a metronome, both urgent and unhurried, never missing a single beat, creating a hypnotic effect, as if the listener is caught in an unseen current.

At 0:28, we hear Granduciel subtly picking his Les Paul for the first time, producing a soothing vibration. One minute in, the round sound of the bass trumpet kicks in, blending neatly with the guitar echos. This combo will reappear again at 2:07. The bass sax and bass trumpet - played by Jon Natchez - thread their way through the entire song, adding a deep, mournful grandeur. These brass instruments inject a dramatic feeling, a contrast to the steady drumbeat that keeps marching onward, refusing to yield.

At 1:32, we get a first glimpse at what appears to be an opponent in the story, reappearing at 2:02, at which Granducial longs for them to be together. 

The War On Drugs performing live

At the 2:30 mark, the intensity shifts slightly — the drumkicks become more pronounced, like shifting to second gear. The guitar sound gets remarkable more stingy, which Granduciel describes as a wild wind blowing through the room, akin a nail driven down through the heart. This is the moment when the journey becomes more than just an endless drift; it becomes a struggle, an attempt to rise above the undertow of despair. We hear this clearly at 3:05, the first time Granduciel is pulling the subject of the moon into his story. Our neighbouring satellite will appear to be a recurring theme further in the song.

At 3:15, the song get more dynamic. The guitar, up until this point merely a decorator in the background, begins to push forward and grabs you by the throat. Granduciel’s signature mix of smooth, bright solo lines and restrained distortion creates an atmosphere of both clarity and dissonance. At 3:44, the guitar is soothingly fading, blending with the saxophone in a way that I think is just perfect.

Adam Granduciel performing with The War On Drugs

Then it's time for the artist to finish his painting. Up until this moment, we have merely witnessed him sketching the outlines of his story, but the details are still missing.

We feel a slightly positive mindset at 4:22, were Granduciel is searching for freedom, longing for peace and finding true love.

At 4:55, we are dragged deeper into Granduciel’s longing desires, as he paints a hillside as cold, dark and hazy that it makes you shiver. At 5:45, the guitar sound is no longer restrained — it wails, it growls, drenched in heavy distortion, as if like the there is a storm disturbing a peaceful ocean.

GenAI impression of darkened hillside

Yet, through it all, Granduciel’s voice remains, not drowned but fighting against the spiraling force of the song. He sings of waiting, of being caught on the wrong side, of knowing there’s no way back but still deciding to push forward. It’s a feeling of survival, of refusal to surrender, even as the storm closes in. In the final moments of the song, a big wall of sound is build before finally, and unexpectedly launching the last note in the sky, forcing a wining and nagging sound that creeps upon the listener…

The War on Drugs has always been about movement, about searching, about the restless need to find something — whether it’s freedom, understanding, love, or just a place to belong. An Ocean in Between the Waves is a perfect encapsulation of that ethos. It’s the sound of a man pushing forward against unseen forces, of love slipping through his fingers, of defiance in the face of inevitability. Through it all, the music remains, vast and immersive, like the ocean itself — endless, powerful, with waves always just out of reach.

And that was just the opening track... 9 more to go 🎸🤘

Live Drugs is in a class of its own. To me, one of the best live albums of the past 10 years.


Controlling teleruptors using Apple Homekit

22 October 2023
Homekit ecosystem

Let's say you want to start controlling and automating (part of) your teleruptor-equipped domestic electrical installation using Apple Homekit.

Before we dive into the technical details, let's first explain how a teleruptor-based system actually works and how it compares to a classic electrical system. 

Adding smarts to a classic electrical system

In a "classic" electrical installation, the light switches are tightly-coupled (hard-wired) to the lights they control. This means there are wires going from your fusebox to your switches and from your switches to your lights. If you want to enable home automation for this kind of installation, you generally have 2 options:

  • Smart Wi-Fi switches to be built into your walls (a popular one being the Shelly 1L)
  • Smart lightbulbs like the ones offered by Philips Hue


Shelly 1L in-wall Wi-Fi switch

These are OK as a retrofit solution, but they have some important disadvantages:

  • Scale: in the case of smart Wi-Fi switches, you need a separate Wi-Fi switch for every series of lights. In case of smart lightbulbs: you need to replace all your classic bulbs with smart bulbs
  • Cost: the automation cost increases linearly when you add switches or bulbs. Next to that, if you are into the Apple ecosystem: Homekit-compatible smart gear tends to be more expensive compared to solutions designed to be compatible with Google Home or Amazon Alexa.
  • Reliability: both solutions rely on wireless communication (Wi-Fi or other radio protocols like Zigbee), which are prone to dropped connections, bad wireless signal, etc.
  • Complexity: some of these solutions require to install some sort of hub which bridges the wireless signals to ethernet. Each brand tends to have their own hub (e.g. the Hue Bridge). Luckily, Matter promises to streamline this landscape in the future. If you plan to buy into such a solution, look out for Matter-compatible gear.
  • Usability: each brand ecosystem comes with its own app, meaning you need multiple apps on your phone to operate all your smart equipment. This makes things cumbersome to use and prevents proper automations across solutions from different brands.

Bottom line: retrofit solutions are fine if you are stuck with a classic electrical installation, but they are far from ideal. If your wiring is still to be done, you should look into a more modern wiring scheme.

The big boys in town

If you wired your house like 10 years ago, the domotica and home automation market was still very immature and expensive. Solutions like KNX, Niko Home Control or Loxone (see image below) have a wide range of capabilities, but are very expensive and lock you to a specific vendor (parts, maintenance, etc.). Moreover, you need a technical background to configure these solutions, set up automations, configure scenes, etc. In the end, you also don't want to throw this complexity over your family members in any case: if the software fails, you should still be able to operate all basic appliances by simple push buttons!

A full Loxone domotica installation

Future-proof wiring

What you are looking for is a decent wiring system which allows you to add home automation in the future once more simple and easy-to-use technology becomes available.

The key aspect here is that you never hardwire switches to electrical equipment. NEVER. This goes for lights, switched outlets, electric shades, shutters, your garage door engine, your door bell, etc. It might cost you a bit more on the wires, but this setup gives you all the flexibility you need in the future.

Enter teleruptors

So how do you switch your lights when using a centralized wiring system? Somewhere, you need to hook up your light switches to your lights. A teleruptor does just that: it sits between the push-button wires and the light wires. Note that in this kind of system, your light switches are stateless, meaning they are essentially push-buttons (e.g. the Niko 170-70001, which can control 1 series of lights). When you operate a push-button, a low-voltage (often 24V) pulse is sent to the teleruptor. The teleruptor reacts to this pulse by flipping its state to allow electricity to flow or stop flowing to the associated lightbulb. A widely used solution is the Eltako S12-200 teleruptor, which is a basic bipolar teleruptor (see image below).

Wired teleruptors

These teleruptors are installed in or near your central fusebox. This is exactly where you want to be, since you have 1 single place where you can throw in a software-based controller to trigger these teleruptors. So how do we get started? Remember, our goal here is to control certain light circuits using the Apple Homekit procotol.

In general, there are 2 solutions here:

  1. Swap (some of) your teleruptors with off-the-shelf smart relays (e.g. the Shelly Pro 1 or the Loxone system mentioned above)
  2. Build your own smart relay and put these parallel to your existing push buttons! 😁

For both of these solutions, keep in mind that your will need some sort of software-based "bridge" to make your relay(s) communicate with Apple Homekit. More on that later.

For this tutorial, we are only going to go into solution 2.

Hardware

Like mentioned above, the idea is to insert a smart relay in parallel to our existing push buttons. This means that the smart relay is on the same level as the push buttons and is pushing a 24V signal to the teleruptor, resulting in the latter to switch the light on or off. So our smart relay is only dealing with low-voltage electric flow, not with 230V.

As a foundation for our smart relay, I highly recommend to use a Raspberry Pi. It has a number of general purpose input/output (GPIO) pins, which we can use to drive a separate relay board. The Raspberry Pi 5 will be released soon, which is the one you want to get to get the latest chipset and features. For the relay board itself, there are various options available. I would suggest to go for a "HAT" solution (Hardware Attached on Top), since you don't need any intermediate breadboards or such. It mounts directly on the GPIO pins of the Pi. With this Raspberry Pi 8-Channel Relay Expansion Board, you will be able to drive 8 teleruptors / light circuits.


Wiring

Warning: do not mess with electronics if you don't know what you are doing. Always cut off the power from your circuits if you want to change things. Consult a professional in case of any doubt.

Let's wire things up:

Wiring scheme

As you can see in the diagram above, we hook up our relay board parallel with our wall push button (yellow dotted lines). Adjust the wiring according to your type of push button, type of relay board and teleruptor type.

How does this circuit works? There are now 2 ways to trigger our teleruptor:

  1. When the push button is pushed and released
  2. When the respective relay on our relay board is opened and closed again

In both of these cases, a 24V signal is passed to the teleruptor which in turn changes its state and turns the light on or off.

These type of teleruptors are build to be triggered by a human manually pushing a button. This action takes around 200ms. So what we need to do now is ensuring the respective relay on our relay board closes the circuit for around 200ms and then opens up again. To do this, we will write a small script on our Raspberry Pi.

Software

OK, back to our end-goal for second: making sure we can use Homekit to trigger our teleruptors. A key software ingredient to make this possible is the wonderful Homebridge package.

Homebridge is a lightweight NodeJS server you can run on your home network that emulates the iOS HomeKit API. It supports Plugins, which are community-contributed modules that provide a basic bridge from HomeKit to various 3rd-party APIs provided by manufacturers of "smart home" devices.

To get started with Homebridge, install Raspberry Pi OS on your Raspberry Pi or go for the off-the-shelf Homebridge image for Raspberry Pi.

Next, we need a special Homebridge plugin to trigger our relay board. We will rely on the omnivalent Script2 plugin for this. This fantastic plugin allows you to execute any script when you operate a Homekit accessory and write the state of this accessory to disk. This is beautifully simple and it even allows for the correct accessory states to be recovered after a power failure! You can add this plugin using the Homebridge UI.

Now we are ready to start playing with the GPIO pins and make our relay board do what we want. Check out the official documentation if you want to learn the details of the GPIO header.

In essence, we will use a custom Python script for this. This script gets called by the Script2 plugin and does mainly 2 things:

  1. Trigger a certain relay on the relay board, depending on which pin you pass as a parameter to the script
  2. Set or remove the flags which indicate the teleruptor state (files on disk)

To use this script, place it in a separate directory in your home directory. Make sure this file is executable using the chmod command. Also create an empty "flags" directory. Make sure this directory is writable (also using the chmod command).

$ mv hb_script2_gpio.py /home/@user@/homebridge_script2/
$ mkdir /home/@user@/homebridge_script2/flags
$ chmod +x /home/@user@/homebridge_script2/hb_script2_gpio.py
$ chmod -R 700 /home/@user@/homebridge_script2/flags

Finally, install the rpi.gpio package to be able to communicate with the GPIO pins from within the Python script:

$ sudo apt-get install rpi.gpio

Now you should be able to do the first test of your setup! Run the following command with the correct pin number (check out the GPIO documentation and the documentation for your relay board to find out which pin to trigger, corresponding to the relay hooked up to your teleruptor)

$ /home/@user@/homebridge_script2/hb_script2_gpio.py @pin@ on
$ /home/@user@/homebridge_script2/hb_script2_gpio.py @pin@ off

When running these commands, you should hear a click sound from the corresponding relay on your relay board. Furthermore, you should see a flag appearing/disappearing in your flags directory.

To finish things off, we should add our teleruptor as an accessory to our Script2 plugin config. You can omit the state, on_value and unique_serial parameters:

"accessories": [
  {
    "accessory": "Script2",
    "name": "Light 1",
    "on": "/home/@user@/homebridge_script2/hb_script2_gpio.py @pin@ on",
    "off": "/home/@user@/homebridge_script2/hb_script2_gpio.py @pin@ off",
    "fileState": "/home/@user@/homebridge_script2/flags/pin_@pin@.flag"
  }
]

Finally, add your Homebridge system to the Apple Home app.

You should now see your accessories pop up, as defined in your Script2 plugin configuration. Tap the icon in the Home app and your connected light should turn on!

Important note: when you push the button, the state of the light will obviously not be updated in the Home app. The idea is to have the push button still available in case of problems with your Pi. However, you should not use it when working with the Home app. This setup is ideal for lights which are mainly triggered by Homekit automations.   

The new iMac 24-inch

20 April 2021
New iMacs in multiple colors

Today, Apple introduced the new iMac 24-inch. Based around the new M1 chip debuted last year, this surely will be a blazingly fast machine. A few initial observations:

  • The new colors definitely look cool (unfortunately, a black option is missing)
  • Only USB-C / Thunderbolt ports, no USB-A or card reader
  • The power supply is now a separate brick, which was probably required given the thin design (only 11.5 mm!). The brick itself is not color-matched with the iMac body.
  • The power brick includes an ethernet port, which is quite smart I think
  • New Magic Keyboard, Magic Mouse and Magic Trackpad are color-matched with the iMac body.
  • The front of the new iMac has nearly white bezels. At first sight, this looks extremely weird to me. Practically all other Apple devices have black bezels... Not sure why they went with such light bezels for the iMac.
  • The typical iMac "chin" is still there, but the Apple logo has been removed. This too is rather strange... Looks like those iMacs they use in TV shows, were they tape over the logo.
  • No word on a bigger screen size comparable to the current iMac 27-inch (which is still for sale). Maybe that version might get a more dark design with black bezels, who knows...

It's a bit ugly indeed, so I fooled around a bit and did some manipulations to the design :-) The mockups below show how the iMac would look like with black bezels and additional Apple logo on the chin.

Silver iMac mockup with black bezels and front Apple logo
Yellow iMac mockup with black bezels and front Apple logo
Blue iMac mockup with black bezels and front Apple logo, together with MacBooks and Mac Mini

To me, that looks a lot more inline with the rest of the line-up. Furthermore, black bezels tend to be more easy on the eyes as a frame for the content displayed on the screen.